Goal of this entry #
If you use EC2 instance and stop it when you don’t use it, you will notice it incurs some cost while you are not using it.
The costs are incurred by mainly EBS and IP address.
Even though the cost is not that big, there could be significant costs involved in some cases. e.g., your organization have a lot of EC2 instance.
In this blog, I will introduce how to use EC2 instance with minimum cost, with as little operational overhead as possible.
Overview & environment #
In this approach, you will
- Create and terminate when you want to use EC2 instance and stop using EC2 instance.
- Just stopping EC2 costs you, so please remember to terminate it.
In my environment, I used the following resources.
- Mac mini as my local computer.
- AWS CLI, Session Manager plugin is installed on my local computer.
Let’s explore how to achieve this step by step!
1. Create launch template and IAM profile(initial setup for a user) #
-
Create an IAM role with the following policies and a security group(not on the diagram above)
- IAM role
- Role name:
dev-ec2-role-instance-profile - Trust policy
{ "Version": "2012-10-17", "Statement": [ { "Effect": "Allow", "Principal": { "Service": "ec2.amazonaws.com" }, "Action": "sts:AssumeRole" } ] } - Policies to attach
AmazonSSMManagedInstanceCore
- Role name:
- Security group
- Assuming you will create an EC2 instance in the default VPC.
- Create a security group named
dev-${DEVELOPER_NAME}-security-groupin the default VPC. - Replace
${DEVELOPER_NAME}with your name. This${DEVELOPER_NAME}will be used throughout this blog.
- IAM role
-
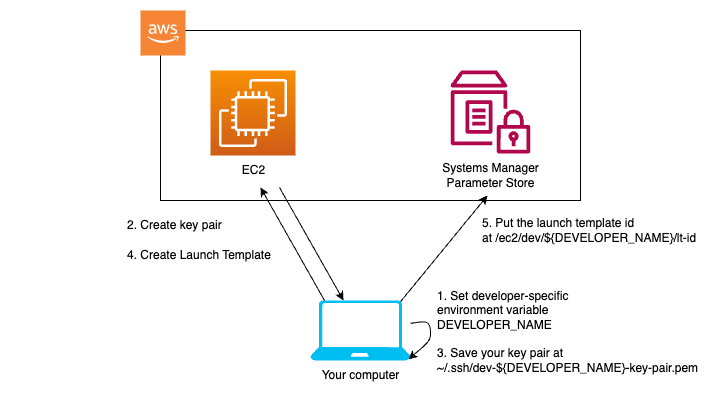
Set environment variables,
DEVELOPER_NAMEandAWS_PROFILEon your computer.- I wrote the follows in
/etc/launchd.conf. This applies to only Mac.setenv DEVELOPER_NAME <your name> setenv AWS_PROFILE <your aws profile> DEVELOPER_NAMEwill be used as a namespace on AWS Parameter Store.
This value must be same as the one in the step 0 above.
It must not conflict with other developers who use the same AWS account.AWS_PROFILEneeds to be the name of a profile in~/.aws/configwhich has permissions to run the commands run after this step.
- I wrote the follows in
-
On your local computer, run the following to create a key pair(2 and 3 in the diagram above).
aws ec2 create-key-pair --key-name "dev-${DEVELOPER_NAME}-key-pair" \ --query "KeyMaterial" \ --output text > "~/.ssh/dev-${DEVELOPER_NAME}-key-pair.pem";- Make sure
DEVELOPER_NAMEis set. If not, restart the terminal app.
- Make sure
-
Create a launch template by running the following on your computer(3 and 4 in the diagram above)
# This will set up docker and git on the instance. USER_DATA=$(base64 << EOF #!/bin/bash yum update -y yum install -y docker curl -L https://github.com/docker/compose/releases/latest/download/docker-compose-$(uname -s)-$(uname -m) -o /usr/local/bin/docker-compose chmod +x /usr/local/bin/docker-compose yum install -y git service docker start useradd ec2-user useradd ssm-user usermod -a -G docker ec2-user usermod -a -G docker ssm-user newgrp docker EOF ) # Set variables to create a launch template. IMAGE_ID=$(aws ssm get-parameter --name /aws/service/ami-amazon-linux-latest/al2023-ami-kernel-default-x86_64 --output text --query 'Parameter.Value'); LAUNCH_TEMPLATE_ID=$(aws ec2 create-launch-template --launch-template-name "dev-launch-template" --version-description "dev-launch-template" --launch-template-data "KeyName=dev-${DEVELOPER_NAME}-key-pair,ImageId=${IMAGE_ID},InstanceType=t3a.small,SecurityGroups=dev-security-group,IamInstanceProfile={Name=dev-ec2-role-instance-profile},UserData=${USER_DATA}" --output text --query "LaunchTemplate.LaunchTemplateId"); aws ssm put-parameter --name /ec2/dev/${DEVELOPER_NAME}/lt-id --value $LAUNCH_TEMPLATE_ID --type String --overwrite;- In the script above, you will create a launch template with the following condition.
- Userdata: install git, docker, and docker-compose
- AMI: latest Amazon Linux 2023 (AL2023)
- Key pair:
dev-${DEVELOPER_NAME}-key-pair, which you created in the previous step. - InstanceType:
t3a.small - Security group: The one that you created in the 0th step.
- VPC: default VPC
- Instance profile: The one that you created in the 0th step.
- After creating the launch template, you put the launch template id in Parameter Store at
/ec2/dev/${DEVELOPER_NAME}/lt-idso that you can retrieve it easily.
- In the script above, you will create a launch template with the following condition.
So these are the steps that you need only once.
From this on, you will follow the steps whenever he/she want to use an EC2 instance.
2. Run an EC2 instance using the launch template #
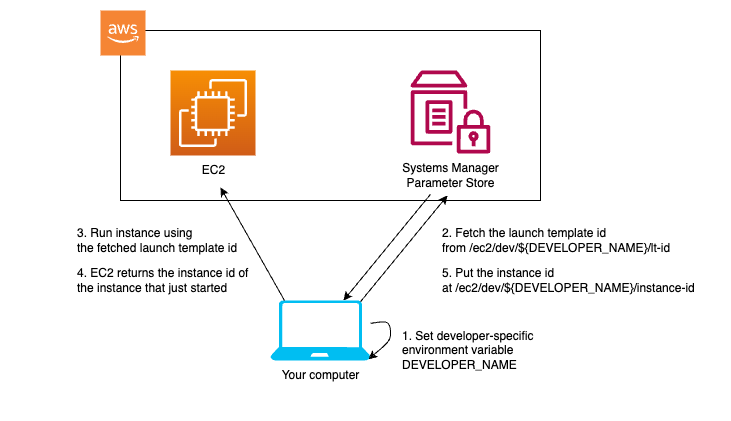
In this section, I will run an EC2 instance using the launch template we just created in the previous step.
For the 1st step in the diagram, we put DEVELOPER_NAME in /etc/launchd.conf, which will be invoked on starting your terminal and any other applications.
So it is already completed and I will start explanation from 2nd step.
- Fetch the launch template id from Parameter Store
# Create an EC2 instance LAUNCH_TEMPLATE_ID=$(aws ssm get-parameter --name /ec2/dev/${DEVELOPER_NAME}/lt-id --output text --query 'Parameter.Value');LAUNCH_TEMPLATE_IDis the launch template id of one we created in the previous step.
- Start instance and put the instance id on Parameter Store
INSTANCE_ID=$(aws ec2 run-instances --launch-template LaunchTemplateId=$LAUNCH_TEMPLATE_ID --output text --query "Instances[0].InstanceId");
aws ssm put-parameter --name /ec2/dev/${DEVELOPER_NAME}/instance-id --value $INSTANCE_ID --type String --overwrite;
So we could run an EC2 instance by only these commands.
3. Connect to the EC2 instance via SSM #
After the EC2 instance has started, let’s connect to it using SSM.

As is mentioned before, the DEVELOPER_NAME is set in /etc/launchd.conf whenever an application starts.
So let me omit the process.
-
Write the following section in your
~/.ssh/confighost dev ProxyCommand sh -c "aws ssm start-session --target $(aws ssm get-parameter --name /ec2/dev/${DEVELOPER_NAME}/instance-id --query 'Parameter.Value' --output text) --document-name AWS-StartSSHSession --parameters 'portNumber=%p'" User ec2-user IdentityFile ~/.ssh/dev-${DEVELOPER_NAME}-key-pair.pem UserKnownHostsFile /dev/null- With this section,
ssh devcommand will fetch your instance id from Parameter Store and connect to it. - The thing here is
UserKnownHostsFile /dev/null, which indicates you don’t write ~/.ssh/known_hosts file. - Since I don’t want EC2 to incur cost while I don’t use an instance, I terminate EC2 instance after using it.
- If you terminate an instance and connect to a newly created instance next time, the ssh will show the caution like
@ WARNING: REMOTE HOST IDENTIFICATION HAS CHANGED! @and you cannot connect to it. - If you did’t write
UserKnownHostsFile /dev/null, you would need to delete a line everytime you connect to EC2 instance.
- With this section,
-
Connect to EC2 instance
INSTANCE_ID=$(aws ssm get-parameter --name /ec2/dev/${DEVELOPER_NAME}/instance-id --output text --query 'Parameter.Value') && \ aws ec2 wait instance-status-ok --instance-ids $INSTANCE_ID && \ ssh dev- You first fetch the instance id from Parameter Store.
- You use
aws ec2 wait instance-status-okto wait for the instance to be ready. - Lastly, it attempts connecting to the EC2 instance.
- You can connect to the EC2 instance using VS code as well. It fetches instance id dynamically in SSH ProxyCommand, so you don’t need to change
~/.ssh/configevery time you run an EC2 instance.
4. Terminate the EC2 instance after finishing the task #
After finishing your task on your EC2 instance, let’s terminate it so that it won’t incur any cost.
INSTANCE_ID=$(aws ssm get-parameter --name /ec2/dev/${DEVELOPER_NAME}/instance-id --output text --query 'Parameter.Value');
aws ec2 terminate-instances --instance-ids $INSTANCE_ID;
Drawbacks #
- If you want to use VS Code remote extension, extensions are not installed by default in a new instance. I wish I could provision all of extensions when I connect to it first time…
- If you forget backing up or pushing the change to git remote repository before termination, the task you have done will be lost.
- If you forget terminating the EC2 instance, it will cost you. It might be good idea to set up EventBridge scheduler to terminate your EC2 instance.